Wednesday, October 17, 2018


Greetings Inky Friends!

Some new and exciting changes are coming!
But before I can release all the info, I'd like to share with you a few fall cards!
More news to come, I promise and it's going to be GREAT!

 I created this card by coloring with Pan Pastels after inking the leaves.

I then lined up the dies to my inked/colored images and ran them through a manual die cutting machine.

 I wrapped my favorite leaves with some jute or twine and popped them up using foam dimensionals.  I inked a sentiment and then splattered some ink across the whole panel.

On these cards, I stamped the leaves in a brown ink and cut the out. I glued them to a craft panel and placed it in a woodgrain embossing folder, and ran the whole thing through the manual embossing machine. I used craft ink to sponge some highlight on the woodgrain and splattered some ink across the whole thing too.


Hope these cards inspire you for some fall fun creations!

Until next time...
Happy Creating!

~Tonya :)

Monday, July 16, 2018

Impromptu Swap!

Greetings Inky Friends!


In one of my online groups, the moderator decided to host an
"Impromptu Swap" where all participants were sent the same image and then each of us had a swap partner that we created a card using this image and sent our creation.

This is the image that we all received:


This forced me to work a little outside my box as this wasn't my normal style. BUT that's also WHY I wanted to join this swap too! I LOVE getting products and being told "Now create something with this!"

So this is what I ended up doing.
Not any stamping other than using Distress and Oxide Distress Inks on the background piece and spraying it with a mica mist. The card base is a brushed gold too so there's a lot of sheen to this card!


And this is the card I received! What's funny is that I originally wanted to cut and layer images but I wasn't sure where and what to cut out and pop up!
How ironic that's what I received!!


This swap concept was really fun and should you have the opportunity to partake, I encourage it! Or maybe it will inspire you to host something
like this as well!

Until next time...
Happy Creating!
~ Tonya :)

Wednesday, July 11, 2018

Minnie Mouse!

Greetings Inky Friends!


Today I'm sharing a card I sent to a friend who got her job
'working for the mouse' as she puts it! Hope she's tickled with it!

I simply punched the mouse head & ears from the yellow panel and laid it down onto a piece of black. I wanted to created a more fluid head and ears as opposed to punching circles and laying them on top of another. I used some Disney Washi Tape, added my popped up sentiment and Minnie's Bow, matted that onto red and then a black card base and called her done!


Hope you enjoyed this quick card!

Until next time...
Happy Creating!
~ Tonya :)

Friday, July 6, 2018

Crafty Keychain Gifts!

Greetings Inky Friends!

I've been working at Craft Fantastic since March
and am loving the vibe and co-workers so much!

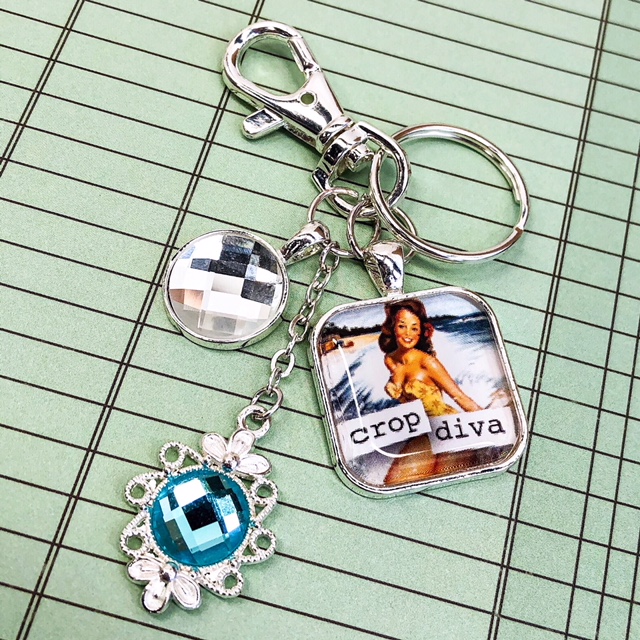
Wehn I saw these Crop Girls images, I KNEW I had to make some fun little gifts to send back to my crafty friends back 'home' in Ohio.
About 10 years ago, I began planning a couple crafty/scrap retreats a year, met some new friends from out of state and somehow we became known as "Tonya's Groupies".
Who said you had to be a rock star to have 'groupie' status? HAH!

Anyways, along with the KeyRing w/Clips (silver or brass), 
Tiny Round Ornate Kit (silver or brass),  Tiny Glass Bling,
Mini Round Trays (silver or brass) and Mini Glass Bling
(clear or champagne), this is what I came up with!
Take a look and let me know what you think!
Everyone seemed to enjoy the happy mail I sent!


Until next time...
Happy Creating!
~Tonya :)

Thursday, July 5, 2018

NEW Catalog!

Greetings Inky Friends!


My how the time flies!! My goal is to be more active in
blogging all the fun things I've been doing and creating!

Today I want to share the release of the NEW FunStamper's Journey Catalog!
It's over 300 pages of inspirational fun with:
3 NEW COLLECTIONS: (Colorful Journey, RSVP & The Good Life);
WASHI TAPE Galore;
PARTY Planning (FOOD SAFE Containers)...
and SO MUCH MORE!
What's your new favorites???

Here's a card I recently made - though - not new to this catalog,
it was the first time inking it for me!

I used the Hello Love Bundle in the colors of Black Licorice, Whip Cream, Lemon Drop & Candy Apple. I splashed some Sparkle Silk and used Candy Apple Sparkle ribbon for some added shine!


Be sure to check it out and LIKE my FB page too! 

Until next time...
Happy Creating!
~  Tonya :)

Friday, November 17, 2017

Greetings Inky Friends!!


Long time, no blog!  I hate how life gets in the way of my creative fun
but I have been busy making the transition from central Ohio to
Albuquerque, New Mexico!  I fell in love with New Mexico 20 years ago and visited again about 2.5 years ago and felt the same way. I was at a point in my life where is was a "now or never" deal so I jumped! It's been a little slow going but I recently landed a job with a small business whose concentration is making customized, hand painted/designed/assembled
Dog Ornaments ~ any breed, any color! Check out the company here
and let me know what you think!
The pictures don't do them justice though! There are several wooden
layers adhered together making them VERY substantial
and impressive and so whimsical and fun!!
I can tell I'm going to love working here!


Now.. onto more crafty goodness and update with Fun Stamper's Journey!

They are promoting "The Big Deal" through the end of the month and what a DEAL IT IS!

You can begin earning 20% OFF ALL your FSJ goodies when you buy the Designer Starter Kit for ONLY $25.00!! And THEN, if you place a qualifying $150 order within your first 21 days, you can purchase the Journey Platinum Machine for ONLY $50.00! It retails for $249.95!
What a $aving$$!


And just in time for the Gift-Giving Season, our entire JEWELRY LINE (Pockets & Lockets) is
ON SALE for 20% OFF!


So all the FUN PACKING to wrap up your jewelry gifts are part of this sale too!! Check out ALL the SALE PRICES HERE!!!

Can't decide what to buy?
FSJ has bundled 2 great necklace looks for the Holiday Joy and
Love (I think it looks a little like the "happiest place on Earth" lover)


Are you a PLANNER Person?
We have 2 GREAT BUNDLES to help get you organized for the
upcoming year at great discounted prices! (over $15.00 $aving$!)


Are you busy making holiday crafts yet??
All my stuff is still in storage and I'm going a little stir-crazy!
Thankfully I found a local scrap store where I can go in during store hours and use their tools; so I plan to visit them to make some Christmas cards and get my fix SOON!

Until next time... and a lot sooner this time ;)
Happy Creating!
Tonya Burke


Monday, December 5, 2016

Christmas fun and a quick Birthday card!

Greetings Inky Friends!

Here's a couple Christmas cards I did at the last crop I hosted....

I used one of my favorite background stamp Swaths of Texture and applied Distress Stains directly to the stamp in a couple reds and silver.  I added red and clear Stickles to the Red or White Christmas wine glasses for added sparkle and shimmer.


I was able to get a second impression from the same stains/background image and decided to create a birthday card using the versatile set Grand Greetings for an OSU loving friend.


The last card I simple covered a piece of card stock with different washing tapes and added the adorable Christmas Carol Kitty to the front. I colored him using Spectrum Noir alcohol markers.


Thanks for stopping by and...

Until next time...
Happy Creating!


~Tonya xoxoxo 

Monday, November 21, 2016

Trust Your Journey!

Greetings Inky Friends!

Here's the last card in my own little personal series of using
the Layered Swirls background stamp!

I created the background using the Polished Stone technique
with alcohol inks and blending solution and inked the back ground stamp
with Black Archival ink and stamped on top.
The polished stone piece that Trust Your Journey is stamped on was a 2nd or 3rd generation of the original inking of the background piece! 
I added some Rhinestones to selected area of the Background and called it complete!
I love the jewel-tones colors in this card!
Thanks for stopping by and...


Until next time...
Happy Creating!
~Tonya xoxoxo 

Monday, November 7, 2016

Coffee and Friends

Greetings Inky Friends!

Today's post brings you more yumminess from the November New Release!
Tomorrow is the LAST DAY to grab these at 15% OFF too!! SO go shop NOW
(well after you look at my card!) haha!

I used the Layered Swirls background and the  Coffee with Friends stamps on this card.
For the background I used the Tim Holtz Polished Stone technique with alcohol inks
and blending solution and then inked the Swirled background with some
Archival Ink and stamped onto the background.
I stamped the Coffee image and fussy cut a border and popped it off the Gold Thread.

Make sure to visit again on November 21st for my last card using this background
(or check the Blog Hop from Nov. 1st to see 3 other cards using this background!)

Until next time...
Happy Creating!

~Tonya xoxox

Tuesday, November 1, 2016

For the LOVE of Backgrounds!

Greetings Inky Friends!!


A new month means a NEW RELEASE from Technique Junkies which means a
NEW SALE of 15% off all November release stamps from 11-1 to 11-08-16.
(Discount will show up in your shopping cart!)

Which means a NEW BLOG HOP! If you are already following along, then you came from the Ms. talented Judy Jackson! IF this happens to be your first stop, then you should really go HERE and start hopping from the beginning! :)

Onto my cards....
I FELL IN LOVE with this BACKGROUND stamp and ended up creating 5 different cards with it trying to give the beauty of this stamp justice! I'll share a few now and save the other 2 for later.... so make sure and follow me so you won't miss them! ;)

For the first 2, I heat embossed the background with clear embossing powder and used these Color Splashes to add color and then mopped up the excess with a paper towel. The embossing powder resists the Splashes!  I used TJ's By the Sea stamp set for the blue~green piece, and this fun little Oh Snap camera set for the pink~peach card!


For this card, I inked the background using a Clear Pigment ink pad and dabbed on some Pan Pastels over the clear ink.  I then re-inked the background with a Whipped Cream (white) ink pad and stamped on top of the chalked image. I added little white dots using a Sharpie marker and heat embossed the TJ sentiment to finish it off!


I can't wait to show you the other 2 cards I did with this background too but or now, it's time to Hop on over to PAT and see what goodness she has to share!!

Until next time...
Happy Creating!

~Tonya 
xoxox

Thursday, October 20, 2016

Silly Kitty...

Greetings Inky Friends!!

I'm here today to share yet another
New October Release from Technique Junkies!

This little fella just cracked me up!! He's the Christmas Carol Kitty and I colored him in using
Fun Stampers Journey

For the background, I used the Christmas Ornaments Trio from Technique Junkies. 

This card is purr-fect for all the Cat Lover's on your Christmas Card sending list!


Until next time...  Happy Creating!

~Tonya ~ oxox

Thursday, October 13, 2016

October is FABULOUS!

Greetings Inky Friends!!


Have you seen the awesome deals happening this month at

Whether you're a card maker, scrapbooker or overall paper crafter, there's something for everyone! Check them out...

$99 is all it takes for this AMAZING Starter Kit
that includes the NEW Amaze Machine
(with EXCLUSIVE Die Set not sold on its own!)


 20% OFF Our Amazing Memories Scrapbooking products!


And our beautiful October Bloom Box complete
with a FULL-SIZED stamp set, 4 prepared kits to
complete cards along with a full-color booklet of instructions with tips, tricks and techniques!
Only $24.95 with a 6 month commitment!


I would LOVE the opportunity to share any of these specials
or talk with your about our product in general!
Please contact me to learn more!

~Tonya :)


Monday, October 10, 2016

Naughty & Nice!

Greetings Inky Friends!!


Today I'm sharing a fun technique using Distress Stains and a Shimmer Spray.
I began by adding stains directly to my background stamp.
I "activated" the stains using the Dylusions Mica spray which has a shimmer in it.
I was afraid that color would over power the stains, but it did not! I would suggest a translucent shimmer spray but I did not have one available at the time of creating :)


I then took some Distress ink and sponged around the Swaths of Texture background piece.
My focal image uses one of the New October Releases called Mrs. Santas List
I colored her using Distress Markers and the green piece used behind her was a
scrap left over I had from another project.
Of course I had to add some more shimmer so I added glitter to her santa hat.
I love the vibrant and retro feel of this card. One of my favorites yet!


Until next time...
Happy Creating!
~Tonya~  oxox

Saturday, October 1, 2016

Time to Sparkle!

Greetings Inky Friends!!


A new month is upon us yet again and we are diving head first into the Holiday Spirit on this month's Blog Hop! Make sure to hit them all beginning HERE to see all the glorious ideas!!
And if you are already hopping along, then you just came
from the Miss Talented Judy Jackson!

And make CERTAIN you check out the Technique Junkies October NEW RELEASES where you'll save 15% OFF
those stamps if you order by October 10th!!

Now on to my cards...

I chose to use the Christmas Ornaments Trio
for both of my shares.
I simply heat embossed all images with Black Embossing Powder onto some brushed silver card stock and
mounted that onto a black card base.
I was once told that a Christmas card couldn't be made using black! I think by using silver, some bling and a little ribbon,
it can!  What do you think??


For my next card, in addition to the Ornament set, I used the Calm & Bright background for the snowflake frame. I inked that up using Archival ink onto white card stock and mounted that on the same brushed silver card stock from above. I also used silver embossing powder this time for the ornament and colored it some using Distress Markers and edged it with the Archival. I created a background for my ornament piece using some phrasing from the set. I had the little glittered chipboard snowflake laying around and added that as well!


I hope you enjoyed these cards! Now hop on over to the one and only Pat Huntoon to check out her wonderful goodness!!

Until next time...
Happy Creating!
~Tonya xoxo

Monday, September 26, 2016

Have Courage

Greeting Inky Friends!


I decided to pull out an OLD TECHNIQUE from the archives of
TJ Newsletters! This one is called "Chalk Dragging" and is from April 2003, Volume 1, Issue 4! However I used 'updated' materials that I didn't know about (if they were even available then?) like Pan Pastels! I tried it first using just one color and then decided to use 2 on the second piece and liked that result better.


I inked the It Takes Courage stamp in a Clear Pigment Ink Pad (Versamark would work too!) and pounced/sponged the same Pan Pastel colors over the image to set it. The beauty with Pan Pastels is that you can erase it! So i erased around the image and words but not too heavy so I can leave that ghosty look to go along with the dragged look. I then folder over a couple piece of Washi Tape to create little flags and popped up the whole image.


I encourage you to take a look at past techniques and try your hand at 'updating' the technique or using your updated supplies and seeing what you end up with! Who knows? You may end up with a totally new technique in the process!

Until next time,
Happy Creating!
~Tonya oxoxo

Monday, September 12, 2016

Greetings Ink Friends!

I'm back today to show a couple Halloween cards using the September New Releases!

I used both the Pumpkin Tree Guy and the Happy Halloween stamps
for both cards just done a little different on each!

For this first card, I heat embossed the Pumpkin Guy with black embossing powder and then painted him in using Art Anthology Paints. I used my finger to paint a moon in the corner too.
After drying, I sprayed the piece with the Colorations sprays and the painted piece resists the sprays! I used a piece of printed paper from the Spooky Prints stack and heat embossed the Halloween greeting in White embossing powder. I die cut a Bat from my Snapshot Frames set and
popped him off the corner to finish off the card.


For the next card, I treated the Pumpkin Guy the exact same way as above, except
I used Cosmic Grape & Blue Lagoon Splashes for the background. I sponged River Rock ink
around the edges and splattered Sour Lemon Silk to create a starry night. I popped him off another print from the Spooky Prints pad. I inked the Halloween greeting in Whip Cream and heat embossed with Clear Powder this time to give a more ghostly effect.


I simply LOVE how the images over at Technique Junkies work so well with all the other supplies we own! Makes them SO versatile! Be sure to hop on over and check them out!

Until Next Time...
Happy Creating!!
~ Tonya    
~oxoxox ~


Thursday, September 8, 2016

BOO!

Greetings Inky Friends!!


I'm back with another couple cards featuring an image from the September
New Release over on Technique Junkies! Remember TODAY is the LAST DAY
to SAVE 15% on your New Release purchases so hop on over there now and
check them out! (well after you look at my cards, HAHA!)

I used the BOO! stamp as the focal image on these 2 cards!
(which is still on sale for 15% OFF today!)
I have the fun neon papers and card stock from the Be Amazing line over
at Fun Stampers Journey and thought it complimented the image so well. I used the Journey Glaze to add dimension to the B and EYES as you can see in the close up photos. I colored the "B" using the amazingly smooth

I hope you agree these cards are fun and whimsical with all the neon goodness!
And don't forget to take advantage
of the last day of the sale!


Until next time...
Happy Creating!
~Tonya -oxoxo

Thursday, September 1, 2016

Spooktacular September!


Greetings Inky Friends!!

Or should I say FIENDS since we're 'celebrating' Halloween? ;)


It's September 1st already and that means another Blog Hop and wonderful
NEW RELEASE from Technique Junkies!! And don't forget, order your September New Releases by the 8th and receive 15% OFF!!

If you are already hopping along, you came from the Miss Talented Judy Jackson!

Now for my shares...
I first cut 2 panels of watercolor paper and sprayed them with a few Art Anthology Colorations sprays. I wasn't totally digging the results so while the paper was still wet, I dripped some Minx inks onto the paper and spread/blended it out with my fingers and misting with more water as needed to achieve the look I wanted.
Disclaimer: I didn't REALLY KNOW what look I was going after! LOL

I loved the look of both as it turned out.
One reminded me of a spooky fall night sky and the other,
a weird sunset glow begging for a Spooky House!

On the first card, I heat embossed the Bats with black embossing powder on top of my shimmery Minx sky. I then used some silver Pan Pastels to create the silver moon glow. I really wanted to add some kind of phrase/wording/title like "Bats about you" but I owned NOTHING of the sort and I thought about printing something like that from the computer but then was worried about covering up too much of that glorious shimmer! I mounted it on a silver shimmer card base too. It really is gorgeous IRL!


Next, I simply stamped the Spooky House with black ink on the other panel and then stamped just the bat in the corner on anther piece of paper, trimmed him out and popped him up. 
I masked off the rest of the words, leaving only the Scary behind, wrapped some black twine and popped it off that. I then used some Journey Glaze to add dimension and shine to the bat and word. Thanks to the Minx, the sky has some shimmer in the sky as well!


Well I hope you enjoyed the cards I shared and find some inspiration in them! 
Next up on the hop, TJ's fearless leader and owner, Pat Huntoon!  Enjoy!

Until next time...
Happy Creating!
~Tonya :) -xoxox-